This short tutorial will show you how to create progress bars for your Angular applications using Angular Material. We’ll also show you the different types of progress bars you can use with Angular Material.
But, enough boring talk, let’s dig right into the meat and bones of this tutorial!
How To Create A Progress Bar With Angular Material
Let’s start with the prerequisites. You must ensure you have generated an Angular project and have installed Angular Material in it.
Given you have installed Angular Material in your Angular project, import the progress bar module into your app module:
import {MatProgressBarModule} from '@angular/material/progress-bar';Then, you’re free to add as many progress bars as you want for your application. Here’s how to add an indeterminate progress bar:
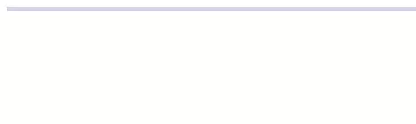
<mat-progress-bar mode="indeterminate"></mat-progress-bar>And here’s what it looks like:
Types of Progress Bars in Angular Material
In Angular Material, there exist multiple types of progress bars. What type of progress bar you should use depends on the use case. We will now list each type of progress bar in Angular Material and explain the typical use cases for that type of progress bar.
Determinate Progress Bar
The determinate progress bar is the default progress bar in Angular Material. It has no animations and the progress is set with the value property. One of the most common use cases for this type is when you’re fetching data from an API and want to display the progress for the user.
Example
Here’s how I simulated the use case with the help of RxJs.
Let’s add the following property to our class (I have created a component for this tutorial, called progress-bar) :
public currentProgress: number = 0;We can now add a determinate progress bar to our HTML and bind our property, currentProgress, to the progress bar:
<mat-progress-bar
  mode="determinate"
  [value]="currentProgress"
></mat-progress-bar>
The next step for us is to create a method in our component that returns an observable that emits a number, which gets increased by 10 every second:
getCounter(count: number): Observable<number> {
    return interval(1000).pipe(
      map(() => {
        count += 20;
        if (count > 100) {
          count = 0;
        }
        return count;
      })
    );
}Now that we have our property and the method in place, we can call the getCounter function and subscribe to the returned observable from ngOnInit :
ngOnInit(): void {
    this.getCounter(this.currentProgress).subscribe((count) => {
      if (this.currentProgress > 100) {
        this.currentProgress = 0;
      } else {
        this.currentProgress = count;
      }
    });
}Every time a new value gets pushed from the observable, we check if the value is greater than 100, if it is we set the current progress to 0; else we set the current progress to the latest value.
Here’s what it looks like if we run this example:

Indeterminate Progress Bar
We have already shown you how to add an indeterminate progress bar to your Angular application so there’s no example to go through here.
The use case for using an indeterminate progress bar is where the user is asked to wait while something finishes and it’s not necessary or possible to indicate how long the operation will take.
Buffer Progress Bar
A buffer progress bar is used to indicate that data is being fetched or uploaded to your application. The most common use case for the buffer progress bar is an application that offers users the possibility to upload and/or download files.
To add a buffer progress bar to your Angular application, you just have to add it to your HTML:
<mat-progress-bar mode="buffer"></mat-progress-bar>Here’s what it looks like:

Example
We’ll now show you a great example of what the buffer progress bar could look like in a real use case.
We reuse the getCounter method we created earlier in the Determinate Progress Bar Example but make some small adjustments to it.
getCounter(count: number): Observable<number> {
    return interval(1000).pipe(
      map(() => {
        return count++;
      })
    );
}In this example, the method pushes a value that gets incremented by one every second.
Let’s then bind a value to the bufferValue attribute of mat-progress-bar in the HTML:
<mat-progress-bar mode="buffer" [bufferValue]="currentProgress"></mat-progress-bar>Moving back to the component, we’ll set the property, currentProgress, to -3 initially. We do this because we want to wait three seconds before the progress bar starts getting filled.
public currentProgress: number = -3;We’ll keep everything else from the previous example as it is. Here’s how the whole progress-bar component should look like:
import { Component, OnInit } from "@angular/core";
import { Observable, interval, map } from "rxjs";

@Component({
  selector: "app-progress-bar",
  templateUrl: "progress-bar.component.html",
  styles: [],
})
export class ProgressBarComponent implements OnInit {
  public currentProgress: number = -3;

  getCounter(count: number): Observable<number> {
    return interval(1000).pipe(
      map(() => {
        return count++;
      })
    );
  }

  ngOnInit(): void {
    this.getCounter(this.currentProgress).subscribe((count) => {
      if (this.currentProgress >= 100) {
        this.currentProgress = 0;
      } else {
        this.currentProgress = count;
      }
    });
  }
}
Here’s what the example looks like:

Query Progress Bar
Let’s go back to the same use case as the previous progress bar type. A more commonly used progress bar for indicating some pre-loading taking place is the Query Progress Bar.
The use case for the query progress bar is to indicate pre-loading before the actual loading of data starts.
To add a query progress bar to your Angular application, you just add a progress bar to your HTML and set the mode to query:
<mat-progress-bar mode="query"></mat-progress-bar>When the pre-loading is done, you should set the mode of your progress bar to determinate. We will in the example go through how to easily accomplish this.
Example
So, you have your query progress bar visible in your application. You now want to make sure the user gets informed when the pre-loading is done and the real fetching of data takes place.
Let’s add a property indicating the mode of our progress bar:
public mode: ProgressBarMode = "query";We can now bind that property to the progress bar in the HTML:
<mat-progress-bar [mode]="mode" value="0"></mat-progress-bar>And regarding the counter; you can reuse the getCounter method from the previous example:
getCounter(count: number): Observable<number> {
    return interval(1000).pipe(
      map(() => {
        return count++;
      })
    );
}Now, let’s just call the method and subscribe to the returned observable in ngOnInit, just as we have done in previous examples:
ngOnInit(): void {
    this.getCounter(0).subscribe((count) => {
      if (count >= 3) {
        this.mode = "determinate";
      }
    });
}We set the mode of our progress bar to determinate after three seconds.
Here’s the result:

Conclusion
This tutorial has shown you how easy it is to add progress bars to your Angular application, all using Angular Material. We went through each type of progress bar, including examples of real use cases of each one.
After following this tutorial, you’ll have a good understanding of how to use Angular Material progress bars, based on your application requirements and specific use case.
We hope you enjoyed reading this tutorial and that you learned from it. Are you interested in learning more about Angular Materials? Check out all our other Angular Material articles here.