Are you just like me when it comes to designing websites? Ain’t nobody got time to get stuck on CSS styling, especially when you’re just starting a new Angular project.
In this article, I’ll demonstrate how easy it is to import Angular Material to your Angular project in just a couple of minutes. But hey, I don’t want to keep you waiting any longer. Let’s dive straight into the juicy details of this tutorial!
Install Angular Material For Your Project
For starters, you’ll need to add @angular/material to your Angular project. Open up your terminal of choice (I use bash as my terminal of choice in vscode) and run the following command:
ng add @angular/material
This command will install Angular Material and any necessary dependencies you may need.
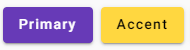
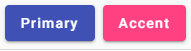
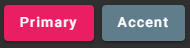
During the installation of Angular Material, you get a couple of configuration options like which theme to use, if you want global Angular Material typography, and if you want to include the Angular Animations module.
I chose the deep-purple pink theme (https://material.angular.io/?theme=deeppurple-amber), enabled global Angular Material typography, and also included the Angular Animations module.
Below is the color combination of each Angular Material theme:
That’s all there is to this step. Next, we’ll import the Angular Material modules we want to use for our website.
Import Required Modules
Now that Angular Material is installed, you’ll need to import the modules you want to use in your project. Open up the app.module.ts file and add the following imports:
import { MatButtonModule } from "@angular/material/button";
import { MatToolbarModule } from "@angular/material/toolbar";
import { MatInputModule } from "@angular/material/input";
import { MatIconModule } from "@angular/material/icon";The BrowserAnimationsModule should already be imported but if it isn’t you can also add that one since it is required to animate the components. The MatButtonModule, MatToolbarModule, MatInputModule, and MatIconModule are just a few examples of the many modules available in Angular Material.
After importing the necessary modules, you’ll need to add them to the imports array in the app.module.ts file:
imports: [
    BrowserModule,
    AppRoutingModule,
    BrowserAnimationsModule,
    MatButtonModule,
    MatToolbarModule,
    MatInputModule,
    MatIconModule,
],Congratulations, you’ve successfully set up Angular Material for your Angular project and imported the Angular Material modules you want. Now, we’ll start utilizing the Angular Material modules to make the website elegant.
Feel free to experiment on your own if you don’t want to follow my way of designing the website, to each their own you know.
You Are Now Ready To Use Angular Material In Your Application
You’re all set to start using Angular Material components in your project!
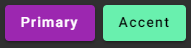
For example, to add an elegant button from Angular Material, simply add the following to your HTML template:
<button mat-raised-button color="primary">This is a nice-looking button</button>
And voila! There you have a nice-looking button.

Let’s Design A Basic Website Using Angular Material
Before we conclude this tutorial I want to show you how easy it is to create a nice-looking website using Angular Material.
Before we start designing the website, we need to import one more Angular Material module, the MatCardModule. Let’s import it and add it to the imports array:
import { NgModule } from "@angular/core";
import { BrowserModule } from "@angular/platform-browser";

import { AppRoutingModule } from "./app-routing.module";
import { AppComponent } from "./app.component";
import { BrowserAnimationsModule } from "@angular/platform-browser/animations";

import { MatButtonModule } from "@angular/material/button";
import { MatToolbarModule } from "@angular/material/toolbar";
import { MatInputModule } from "@angular/material/input";
import { MatIconModule } from "@angular/material/icon";
import { MatCardModule } from "@angular/material/card";

@NgModule({
  declarations: [AppComponent],
  imports: [
    BrowserModule,
    AppRoutingModule,
    BrowserAnimationsModule,
    MatButtonModule,
    MatToolbarModule,
    MatInputModule,
    MatIconModule,
    MatCardModule,
  ],
  providers: [],
  bootstrap: [AppComponent],
})
export class AppModule {}
We will add a header, a basic hero, and a card filled with some placeholding content.
The header is simply created by using the element mat-toolbar included in the module MatToolbarModule. We’ll also add some icons, a website name, and navigation to the header. This is the HTML for the header:
<mat-toolbar color="primary">
  <mat-icon class="clickable">menu</mat-icon>
  <span>Angular Material Tutorial</span>

  <span class="toolbar-spacer"></span>
  <mat-icon>settings</mat-icon>
  <button mat-button>Sign In</button>
</mat-toolbar>The rest of the website is placeholding content, just to have some content on the website. Here’s the content I added to the website:
<div class="hero">
  <div class="hero-content">
    <h1>This is a very basic website created with Angular Material</h1>
    <p>
      Lorem ipsum dolor sit amet, consectetur adipiscing elit. Duis malesuada
      eros eget arcu euismod consequat.
    </p>
    <button mat-raised-button color="accent">Learn More</button>
  </div>
</div>

<div class="content">
  <div class="section">
    <mat-card>
      <mat-card-header>
        <mat-card-title>Section 1</mat-card-title>
        <mat-card-subtitle>Subtitle</mat-card-subtitle>
      </mat-card-header>
      <mat-card-content>
        <p>
          Lorem ipsum dolor sit amet, consectetur adipiscing elit. Duis
          malesuada eros eget arcu euismod consequat.
        </p>
      </mat-card-content>
      <mat-card-actions>
        <button mat-button color="primary">Read More</button>
      </mat-card-actions>
    </mat-card>
  </div>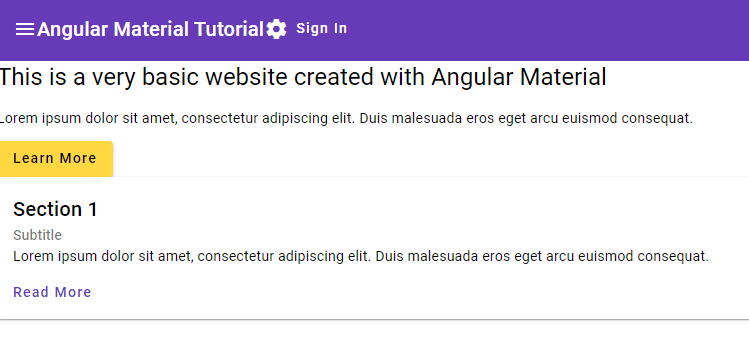
</div>If you run your application you may notice that some elements are placed a bit strangely, for example, all content in the header is cramped up on the left side:
Since we already added some classes to the HTML elements, we can add styling to these classes. I recommend keeping all styling in a separate stylesheet file but since this example is very simple I’ll just add it as inline styling in the app.component.ts file:
import { Component } from "@angular/core";

@Component({
  selector: "app-root",
  templateUrl: "./app.component.html",
  styles: [
    `
      .toolbar-spacer {
        flex: 1 1 auto;
      }

      .section {
        margin-top: 2.5rem;
      }

      .clickable {
        cursor: pointer;
      }
    `,
  ],
})
export class AppComponent {
  title = "angular-material-tutorial";
}
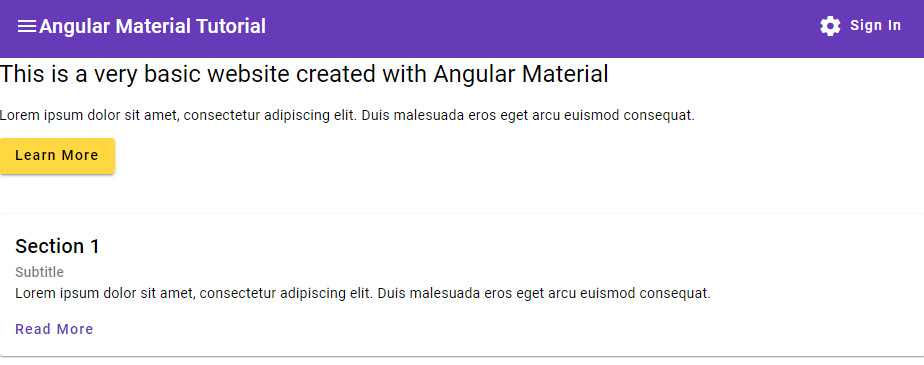
If we look at our application again it should look a bit better:
And that’s basically how you start out with designing websites using Angular Material. Easy, right?
Conclusion
In conclusion, Angular Material is a powerful tool that can save you time and effort when creating UIs for your Angular project. By following these easy steps, you’ll be up and running with Angular Material in no time. So, what are you waiting for? Go forth and create beautiful UIs with ease!
And hey, if you ever get stuck, just remember: there’s no shame in Googling your way out of a problem. After all, even the best programmers need a little help from time to time.
If you are interested in learning more about web development, check out our other articles here or continue reading the next Angular Material tutorial here. In the next Angular Material tutorial we’ll dive deeper into buttons.